Reference Authorization flows
A backchannel flow designed for traditional server-based web applications.
Authorization Code flow is designed for traditional server-based web applications, also referred to as confidential clients. These applications can securely store a client secret and establish back-channel communication with the Authorization Server (Idura Verify). This facilitates a secure code-for-token exchange during authentication.
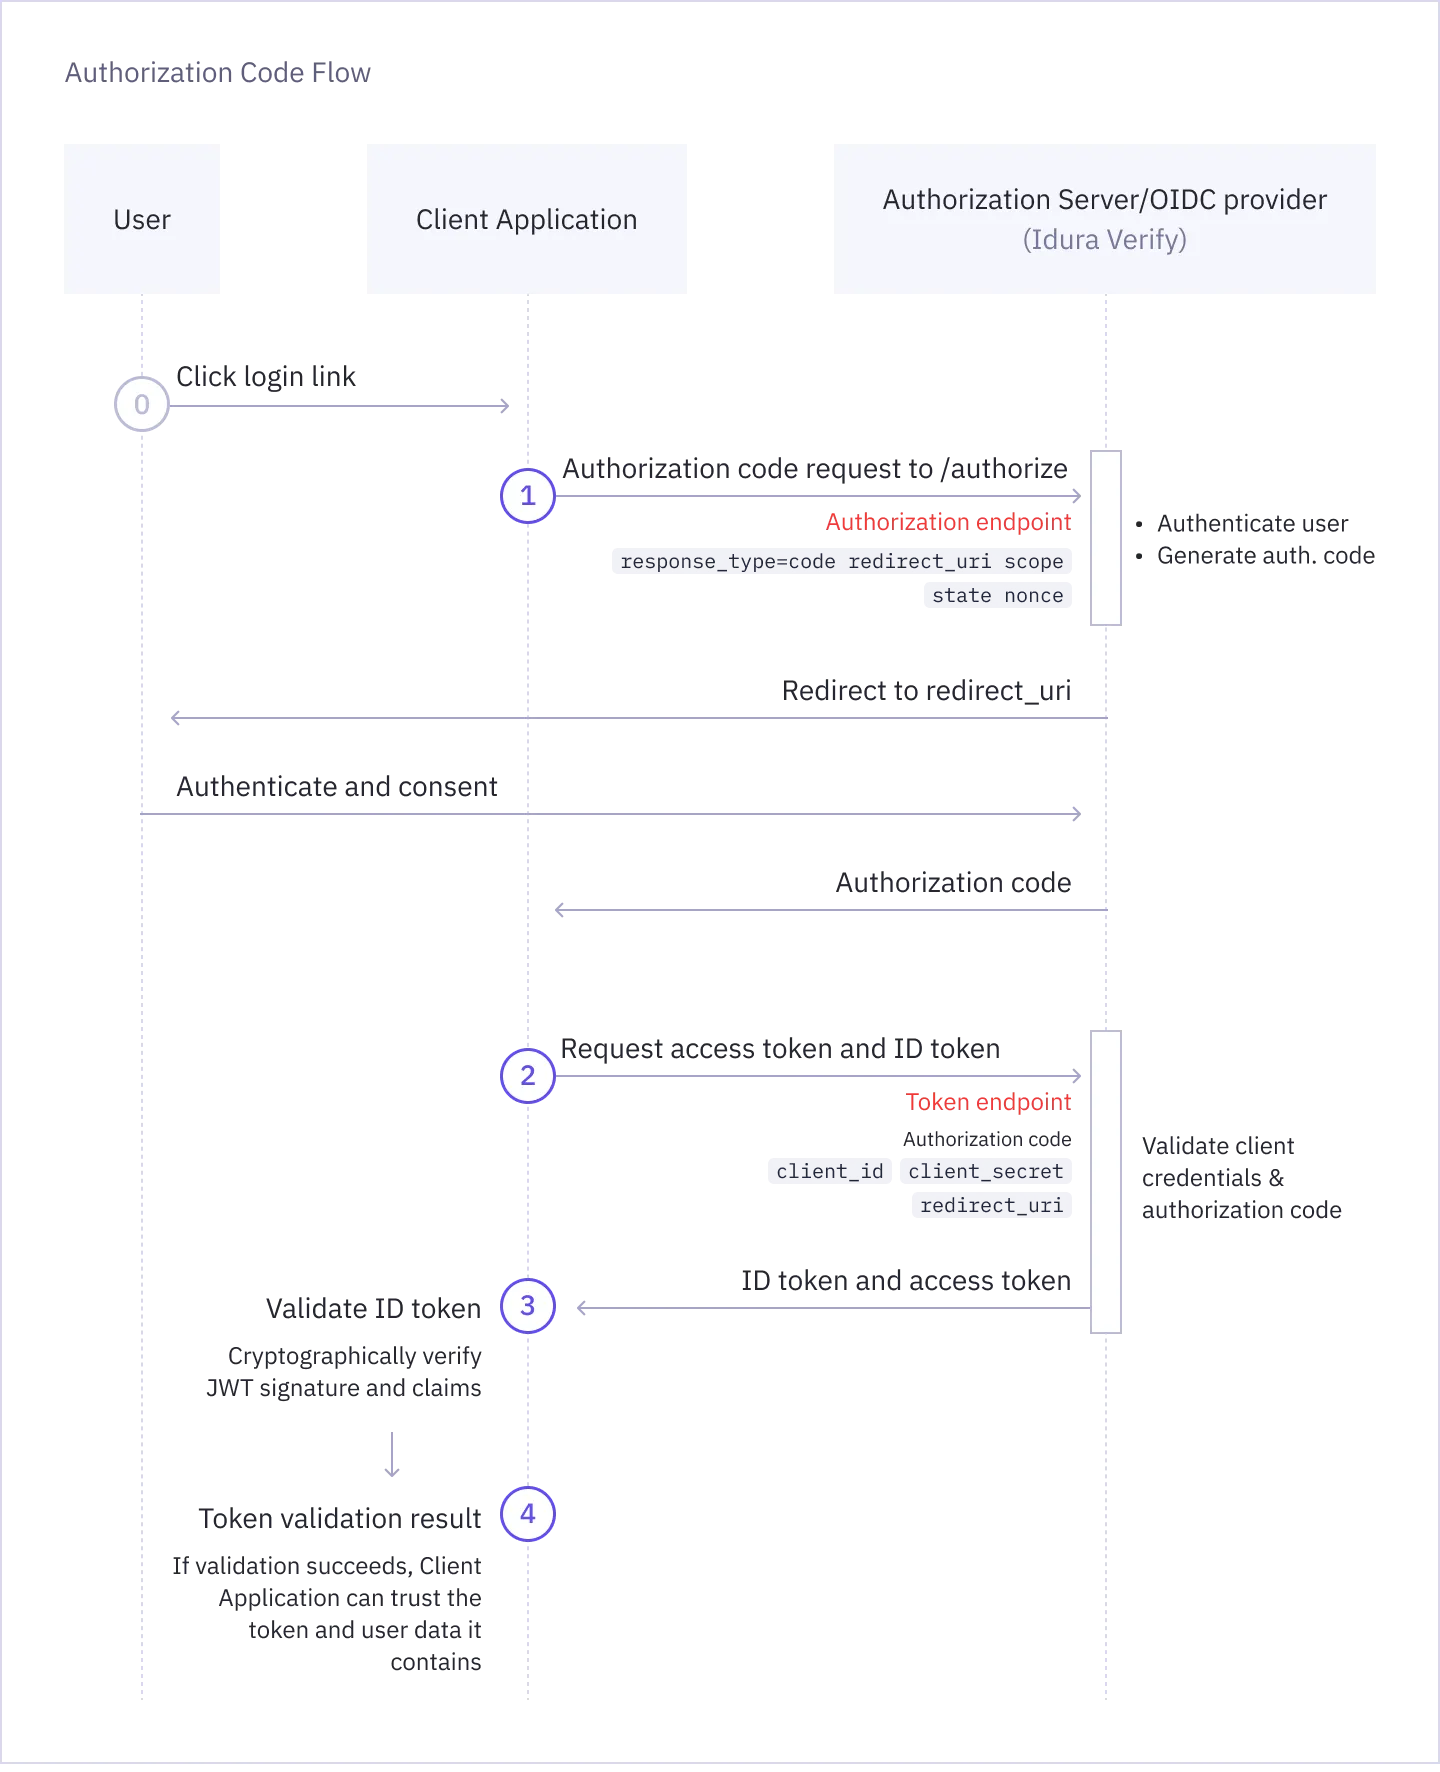
To start the login flow, send the user to the OAuth2 authorization endpoint (/oauth2/authorize) with the appropriate set of query parameters.
GET https://YOUR_SUBDOMAIN.idura.broker/oauth2/authorize?
    response_type=code&
    response_mode=query&
    client_id=CLIENT_ID&
    redirect_uri=YOUR_REDIRECT_URL&
    acr_values=CHOSEN_IDENTITY_SERVICE&
    scope=openid&
state=YOUR_STATEresponse_type=code: Indicates that you are using the Authorization Code flow and that you want to receive an authorization code in the response.response_mode=query: Indicates that the authorization code should be returned in the query string of your redirect URI.client_id: The client ID of your Idura Verify application.redirect_uri: The URL to which the user will be redirected after authentication. This must match one of the redirect URIs registered for your application in your Idura Dashboard.acr_values: The specific eID method you want to trigger, e.g. urn:grn:authn:dk:mitid:substantial for Danish MitID.scope: The scopes you want to request. Must always include openid, and can include additional scopes depending on the user data you want to receive in the token.state: A random alphanumeric string you generate. This exact value will be returned in the response and can be used to verify that the response corresponds to the request you sent, protecting your app from cross-site request forgery (CSRF) attacks.Use our Authorize URL Builder to generate authorize URLs with your chosen parameters. For a full list of supported parameters, see Authorization request parameters reference.
A more secure alternative to traditional authorization requests is Pushed Authorization Requests (PAR).
PAR lets you initiate the authentication flow by sending authorization request parameters directly to the authorization server via a POST request.
This approach keeps parameters out of URLs, making requests more secure and protecting their integrity. It also ensures sensitive data remains confidential, e.g. if you are including PII in a login_hint.
You will receive an HTTP 302 response which redirects your browser to your specified redirect_uri with the authorization code included in the query parameters:
HTTP/1.1 302 Found
Location: YOUR_REDIRECT_URL?code=AUTHORIZATION_CODE&state=YOUR_STATE
If the authentication request fails, the redirect will include an error code instead:
HTTP/1.1 302 Found
Location: YOUR_REDIRECT_URL?error=ERROR_CODE&error_description=...&state=YOUR_STATENext, you must exchange the returned code for an actual token. This is done by posting the authorization code received from the previous step to the token endpoint (/oauth2/token).
You must format this request as an HTML form (application/x-www-form-urlencoded) and send the credentials in the Authorization HTTP header in Basic format.
You must also x-www-form-urlencode the values of the CLIENT_ID and CLIENT_SECRET before constructing the Authorization header.
HTTP POST https://YOUR_SUBDOMAIN.idura.broker/oauth2/token
Content-Type: application/x-www-form-urlencoded
Authorization: Basic BASE64(xWwwFormUrlEncode(CLIENT_ID):xWwwFormUrlEncode(CLIENT_SECRET))

grant_type=authorization_code&
code=AUTHORIZATION_CODE&
redirect_uri=YOUR_REDIRECT_URL
Idura Verify also supports receiving the client credentials in the POST request body, but this usage is discouraged by the OAuth2 specification.
We strongly recommend that you send the credentials in the Authorization: Basic ... HTTP header value as shown above.
The client_id, client_secret and redirect_uri must be exactly the same as you used in the authorization request.
Because exchanging the authorization code requires your static client_secret (which acts as a password), this HTTP POST request must always be made from your backend server.
Never include your client secret in the frontend code.
If you are building a frontend application that cannot safely store a secret, you must use the PKCE flow instead. With PKCE, the secret is generated on the fly for each authorization request, and no special handling is required.
# PHP
"Authorization" => "Basic ".base64_encode(urlencode(IDURA_CLIENT_ID).":".urlencode(IDURA_SECRET))
// Node.js
'Authorization': "Basic " + Buffer.from(`${encodeURIComponent(IDURA_CLIENT_ID)}:${encodeURIComponent(IDURA_SECRET)}`).toString('base64')
// Javascript
'Authorization': "Basic " + btoa(`${encodeURIComponent(IDURA_CLIENT_ID)}:${encodeURIComponent(IDURA_SECRET)}`)// C#
using System;
using System.Text;
"Basic " + Convert.ToBase64String(Encoding.ASCII.GetBytes(Uri.EscapeDataString(IDURA_CLIENT_ID) + ":" + Uri.EscapeDataString(IDURA_SECRET)))
// C# - if you have a dependency on System.Web.dll or you are willing to take it
using System;
using System.Text;
using System.Web.Security.AntiXss;
"Basic " + Convert.ToBase64String(Encoding.ASCII.GetBytes(AntiXssEncoder.UrlEncode(IDURA_CLIENT_ID) + ":" + AntiXssEncoder.UrlEncode(IDURA_SECRET)))A successful request to the token endpoint will return an HTTP 200 OK along with a JSON payload with your tokens.
The id_token contains the authenticated user’s identity information.
HTTP/1.1 200 OK
Content-Type: application/json

{
  "id_token": "eyJ0eXAiOiJKV1QiLCJhbGciOiJSUzI1NiIsImtpZCI6IjgyN0Q5QTNFOTg2MTY0OTVBQzZGRTE3MUFFNkRBM0IzQ0ExNDE5MjEifQ.eyJpc3MiOiJodHRwczovL25hdGFsaWEtZGV2LXRlc3QuY3JpaXB0by5pbyIsImF1ZCI6InVybjpjaWJhIiwiaWRlbnRpdHlzY2hlbWUiOiJzZWJhbmtpZCIsImF1dGhlbnRpY2F0aW9udHlwZSI6InVybjpncm46YXV0aG46c2U6YmFua2lkIiwiYXV0aGVudGljYXRpb25tZXRob2QiOiJ1cm46b2FzaXM6bmFtZXM6dGM6U0FNTDoyLjA6YWM6Y2xhc3NlczpTb2Z0d2FyZVBLSSIsImF1dGhlbnRpY2F0aW9uaW5zdGFudCI6IjIwMjQtMDUtMjJUMTA6NDE6NDEuMzYxWiIsIm5hbWVpZGVudGlmaWVyIjoiYmI5YzIzNjRkZmFlNDRmM2JjZmQ5OTkwNTNkOTRmOWUiLCJzdWIiOiJ7YmI5YzIzNjQtZGZhZS00NGYzLWJjZmQtOTk5MDUzZDk0ZjllfSIsInNlc3Npb25pbmRleCI6ImI2NWYxMWI2LWViYTctNDg4Mi05MDBhLTVmMmQ5M2EzOGRiYSIsInNzbiI6IjE5NjgwMjAyMDU3NSIsIm5hbWUiOiJUZXJuZSBQYXVsc2VuIiwiZ2l2ZW5uYW1lIjoiVGVybmUiLCJnaXZlbl9uYW1lIjoiVGVybmUiLCJzdXJuYW1lIjoiUGF1bHNlbiIsImZhbWlseV9uYW1lIjoiUGF1bHNlbiIsImlwYWRkcmVzcyI6IjE4NS4xNTcuMTM0LjEzNCIsImNvdW50cnkiOiJTRSIsImlhdCI6MTcxNjM3NDUwMSwibmJmIjoxNzE2Mzc0NTAxLCJleHAiOjE3MTYzNzU3MDF9.RVQnlukfoH597uXzE1Gays5DElGzAr8xgOmi7ZWppaL3QPGhV4vK2o6qLhxXg_-FKG9xCwHR6gEhnNzWA3W3B6Q2zJeQTYh9okUvTmmhAFIyDL7lEtfWVVKUKvauDisYVZDjAxJQS_1zbgPEi5I-UJ6_kvMGH-wC13MAD2bZGTGR2dR-ZevBUn7plOt0PKXrIZD3vwxDfebTMPQqX_9SNT5F7GLjCcpeVK-T5LOgmUMFcTAbHvNyklqP5ymRHsZLDw_ib4I7ZqODhR-3uISWo1NvG4Y84iBcqv50WRNlmMUm004LfPw1flM5DNsVyUWCqYW8m7eBEwLp5va-6OQG4w",
  "access_token": "cf1ce646-7fbe-4740-9c56-fe3f0891f6c6",
  "token_type": "N_A",
}You can now proceed to validating the ID Token Idura Verify returned in response and access the end-user information it contains. The validation step is required: without it, you cannot trust the contained end-user information.
Idura provides a list of integrations that handle most of the authentication process, including JWT validation. Alternatively, we strongly recommend that you find a battle-hardened library for your specific platform to do this heavy lifting. You can find an extensive list of libraries on jwt.io.
For more information, see OpenID Connect security best practices and JWT validation guide.